by Hélène Ceré
The creation of a glass piece of art
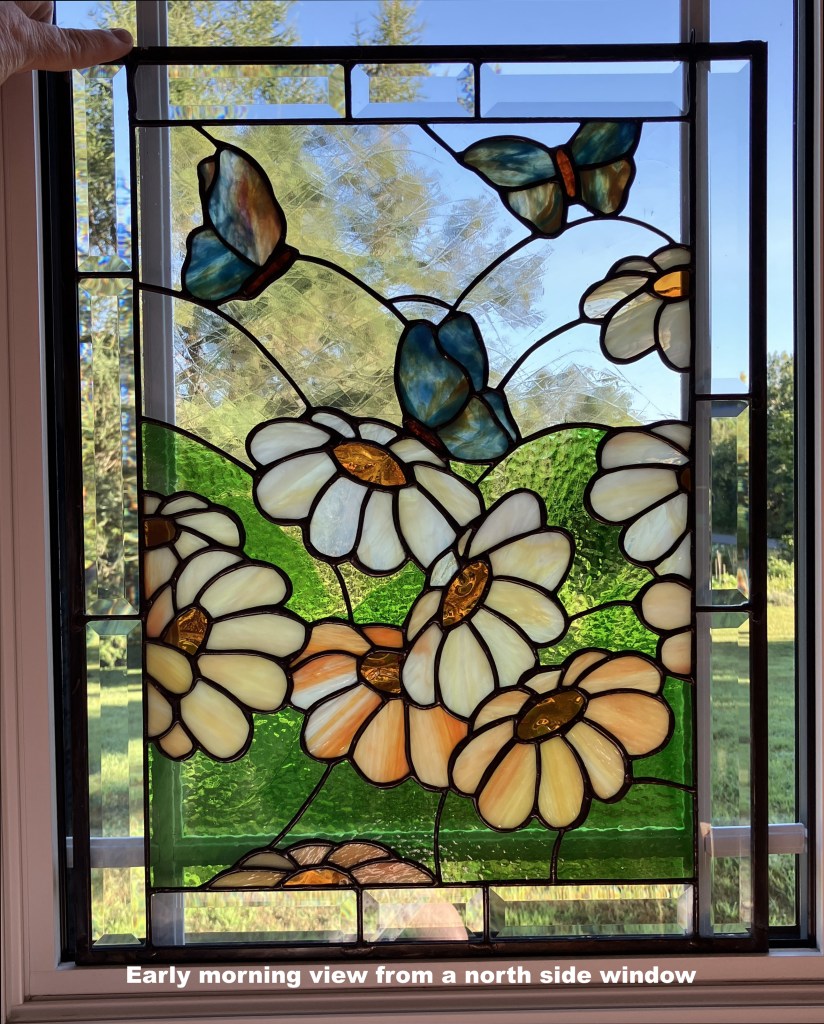
I present to you Field Flowers, a 21 x 16 inch stained glass panel, assembling 118 pieces of glass using copper foil and framed with zinc channels. Field Flowers will be exposed at the Glengarry Pioneer Museum Annual Show from 9 to 31August 2025.

Field Flowers took months to make. Creating a stained-glass art piece involves several steps and it all starts by gazing at nature! Yep, I gaze a lot! From all my gazing, an idea emerges which I draft on paper. The design pattern starts to take shape as I erase, redraw, trace and do it again and again until I am happy with it (usually I fill my recycling basket). Once I am satisfied with my design, the colour scheme takes form as I try various combinations of colours on a sketched pattern.
The colour scheme needs to be adapted to the reality of glass. Colours, textures and transparency of art glass frames the expression of the design. That is where I get lots of finger nicks and cuts from juggling around all the glass until I find the perfect combination. I look at my glass choices on my light table and through the windows at different times of the day and lighting conditions until I get it right. Some glass has a great variability in how it shows depending on the light source and environment.
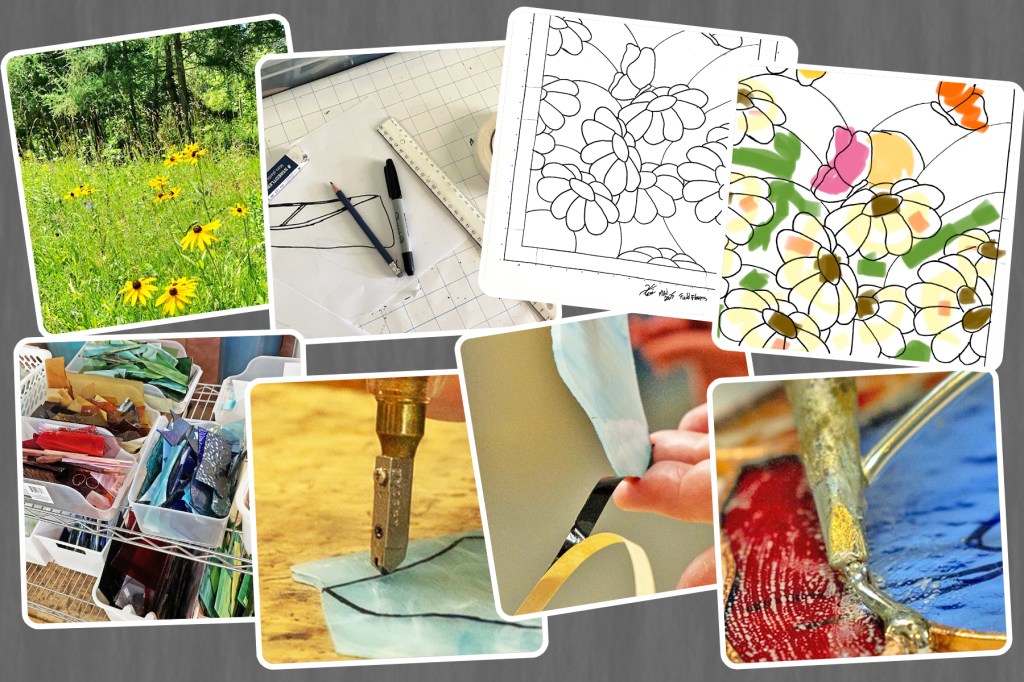
When I am happy with a glass combination and I have my pattern ready, then the building of the stained glass panel begins. Tracing the pattern onto glass, cutting glass pieces, foiling, assembling and soldering are the steps that bring the design together. As I complete the soldering, I always get nervous, unsure of the final result as the glass is grimy from the flux and has felt pen marks produced by tracing. But I know that it will… it should … look good when it is done. Just like the painter mid-way in a painting, there is a moment of doubt, it just looks kind of bad before it will look good. Excitement builds up as I finish the last soldering touches and proceed to neutralizing the flux.
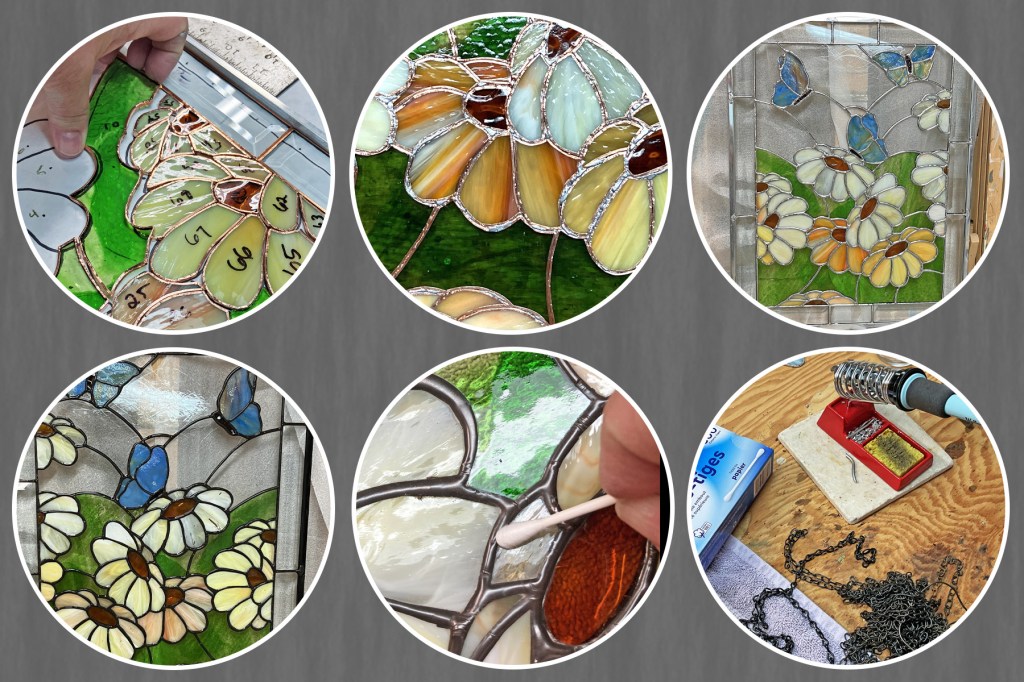
The natural colour of solder is ‘’silver’’. I always like to use a patina; in this piece I used a black patina. I find that black defines the lines and contours. A patina is a chemical that reacts with the solder surface coat and blackens it. The last step is waxing. I use a special wax that will clean, protect and make the glass and metals shine.
It is only at this step that all the magic happens. Suddenly, the glass takes life, unsuspected colours and textures appear. My heart beats hard and fast, I am excited, I think it looks good! As I get the piece to a window, the final test, I hold my breath. I look; I scrutinize; I analyze.
Yes! It is what I had envisioned in my mind and even better! This is why I do it. The thrill of that moment when the glass magic takes place, right in front of that window. The sunlight captures all the qualities of the art glass and brings my vision into reality. That is why I love glass art!
Then I get ready to gaze again just so I can make another one… .
Wow! Exciting to see the steps in the production of a piece. Share your process. Send words & pictures to cagac.ca@gmail.com
Wow! C’est excitant de voir les étapes de la production d’une œuvre. Partagez votre processus. Envoyez-nous vos photos et textes à cagac.ca@gmail.com.

Thanks so much for sharing the process of your art, Helene Cene, I have saved a copy of your article so I can read it again at my leisure. No, I am not tempted to take up glass staining, but I do enjoy learning how artisans work. I did not understand what you meant by foiling so I asked Google for an explanation and found an excellent YouTube description of the process: “Copper Foiling Glass Pieces for Stained Glass.” It looks very tricky. I am now fascinated by the process of glass staining and convinced that it is not a craft for me! Your window is beautiful. When I see Field Flowers at the Glengarry Pioneer Museum, I will appreciate it all the more, knowing something about the complicated process that created it.
>
LikeLiked by 1 person
Beautiful work! Thanks for sharing.
LikeLiked by 1 person
WOW! So interesting! Thank you for describing the process, Helene. And what a beautiful piece of art!
LikeLike
What a stunning and methodical process! Thank you for sharing this with us Hélène. J’ai appris beaucoup sur le travail de vitrail.
LikeLike